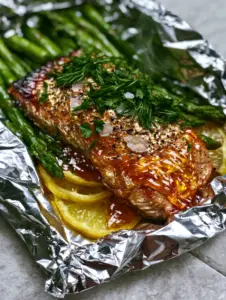
Hawaiian chicken is the vibrant, soul-warming meal that bridges the gap between a tropical vacation and a busy weeknight reality. This isn’t just another stir-fry; it is a masterclass in texture, featuring bite-sized chicken thighs with deep sear marks and a thick, glistening mahogany-colored glaze that clings to every crevice.
When you pull this rustic metal sheet pan out of the oven, the visual impact is immediate. You are greeted by large chunks of fresh pineapple with caramelized, blistered edges and vibrant red bell pepper strips that have softened into sweet, tender ribbons alongside translucent purple onion wedges.
The final touch—a heavy scattering of freshly chopped cilantro and a light dusting of toasted white sesame seeds—adds a layer of professional polish. Served next to a steaming mound of fluffy jasmine rice, this dish captures the essence of island flavors with the convenience of a single-pan cleanup.

Why This Sticky Pineapple Hawaiian Chicken Works Every Time
Creating the perfect Hawaiian chicken requires more than just tossing ingredients together; it is about managing moisture and sugar to achieve that iconic mahogany finish. By focusing on high-heat searing and a concentrated pineapple reduction, we ensure the chicken remains juicy while the exterior develops a savory crust.
- Textural Contrast: The combination of charred, crispy chicken skin and soft, roasted purple onion petals provides a sophisticated mouthfeel.
- The Mahogany Glaze: We use a specific ratio of brown sugar to soy sauce and pineapple juice to create a thick, sticky coating that shines under natural light.
- Balanced Acidity: The caramelization of the fresh pineapple chunks cuts through the richness of the chicken thighs, providing a bright, tangy pop in every bite.
- Effortless Presentation: The sheet pan method allows the colors of the red peppers and green cilantro to pop against the neutral grey stone background of your dining table.
The Anatomy of a Perfect Island-Style Glaze
The heart of this Hawaiian chicken lies in the glaze, which must be thick enough to coat a spoon and dark enough to be described as mahogany. We achieve this by simmering the sauce components before they ever touch the chicken, allowing the sugars to begin the caramelization process early.
If you enjoy the profile of this sauce, you might also find yourself craving other fruit-forward poultry dishes like our honey lime chicken or perhaps a more savory coconut chicken for your next meal prep session.

Essential Ingredients for the Ultimate Sheet Pan Feast
To achieve the specific visual results of our forensic blueprint, every ingredient must be selected for its ability to withstand high heat while contributing to the final color palette. Do not substitute the fresh pineapple for canned if you want those characteristic blistered, charred edges.
The Protein and Produce
Chicken Thighs: 2 lbs (900g) of boneless, skinless chicken thighs, cut into 1.5-inch pieces. Thighs are essential here because they contain enough fat to produce those deep, dark char marks without drying out during the roasting process.
Fresh Pineapple: 2 cups (330g) of fresh pineapple chunks, cut into large 1-inch pieces. Fresh fruit contains the natural sugars necessary for blistering; canned pineapple is often too waterlogged to caramelize properly.
Red Bell Peppers: 2 large (300g) red bell peppers, sliced into thick strips. These provide the “vibrant red” visual anchor described in our blueprint and add a subtle sweetness when roasted.
Purple Onions: 1 large (150g) purple onion, cut into thick wedges or “petals.” The wedges should be kept intact at the root so they soften into translucent, tender pieces rather than disappearing into the sauce.
The Mahogany Glaze Components
Soy Sauce: 1/2 cup (120ml) of low-sodium soy sauce. This provides the deep umami base and the foundational dark pigment for our mahogany color.
Brown Sugar: 1/2 cup (100g) packed light brown sugar. The molasses content in brown sugar is what gives the glaze its “sticky” texture and helps the chicken develop those sear marks.
Pineapple Juice: 1/4 cup (60ml) 100% pineapple juice. This reinforces the tropical profile and adds the necessary acidity to balance the saltiness of the soy.
Invisible Essentials: 2 tbsp (30ml) neutral oil (like avocado or vegetable oil) for high-heat searing, 1 tsp (6g) kosher salt, and 1/2 tsp (2g) black pepper for foundational seasoning.
Must-Have Kitchen Tools for Sheet Pan Success
To replicate the “rustic dark metal sheet pan” aesthetic, you need the right equipment that conducts heat efficiently. A heavy-duty rimmed baking sheet is non-negotiable for preventing the glaze from running off and creating a mess in your oven.
- Large Rimmed Baking Sheet: A dark metal pan is preferred as it absorbs more heat, helping to create those dark sear marks on the chicken thighs.
- Small Saucepan: For pre-reducing the glaze to ensure it is thick and glistening before it hits the oven.
- Whisk and Silicone Brush: To ensure the cornstarch is fully incorporated and to paint the chicken with extra glaze during the final minutes of cooking.
- Rice Cooker or Heavy Pot: To prepare the steaming jasmine rice that serves as the perfect neutral base for the bold flavors of the Hawaiian chicken.
Step-by-Step Instructions: Mastering the Sear and Glaze
Follow these steps closely to ensure your final dish looks exactly like the handheld smartphone photo described in our visual prompt. The key is in the timing and the layering of ingredients.
Phase 1: Preparing the Mahogany Base
In a small saucepan over medium heat, combine the soy sauce, brown sugar, pineapple juice, and a slurry of 1 tbsp (8g) cornstarch mixed with a little water. Whisk constantly until the mixture thickens and takes on a deep, dark brown hue.
Remove from heat and set aside. The sauce should be thick enough to coat the back of a spoon—this ensures it will stay on the chicken rather than pooling at the bottom of the pan.
Phase 2: Searing for Visual Texture
Preheat your oven to 425°F (220°C). Toss the chicken thigh pieces in 1 tbsp (15ml) of oil and season with salt and pepper. Arrange them on the rustic dark metal sheet pan, ensuring they aren’t crowded.
Roast the chicken alone for 10 minutes. This initial high-heat blast is what creates the “deep sear marks” before the moisture-heavy vegetables are added to the pan.
Phase 3: The Full Pan Roast
Remove the pan from the oven. Add the pineapple chunks, red bell pepper strips, and purple onion wedges. Pour 3/4 of the mahogany glaze over everything and toss gently with tongs to coat.
Return the pan to the oven for another 15-20 minutes. Watch for the sensory cues: the smell of caramelizing sugar should be intense, and you should see the edges of the pineapple starting to blister and blacken slightly.
Phase 4: The Final Garnish
Once the chicken is cooked through and the vegetables are tender, remove from the oven. Brush the remaining glaze over the chicken for that extra “glistening” look. Scatter the toasted sesame seeds and chopped cilantro heavily across the pan.
Plate a mound of steaming jasmine rice in the corner of the pan (or on the side) to soak up the residual juices, just like in our coconut chicken rice bowl presentation.
Expert Tips for Visual and Culinary Excellence
- Don’t Overcrowd: If the chicken pieces are too close, they will steam rather than sear. Use two pans if necessary to maintain the char marks.
- The Broiler Trick: If your glaze isn’t dark enough, turn on the broiler for the last 2 minutes. Keep a close eye on it, as the high sugar content can go from mahogany to burnt very quickly.
- Fresh Herbs Matter: Only chop the cilantro seconds before serving to ensure it stays “bright green” against the dark sauce.
- Rice Consistency: Rinse your jasmine rice three times before cooking to remove excess starch, ensuring it stays “fluffy and steaming” rather than gummy.
Serving and Pairing Suggestions
Hawaiian chicken is a complete meal on its own, but it pairs beautifully with other Pacific-inspired dishes. If you want to expand the spread, consider serving it alongside a refreshing Asian chicken crunch salad for added texture.
For a complete tropical theme, a chilled classic lemonade or even a light strawberry rum cocktail can balance the savory depth of the soy-based glaze. If you have leftover pineapple, use it to make watermelon fries for a fun, fruit-centered dessert.
Storing, Reheating, and Meal Prep
This recipe is a meal prepper’s dream. The flavors of the Hawaiian chicken actually deepen after a day in the refrigerator, as the pineapple juice continues to tenderize the meat.
Storage: Keep in an airtight container for up to 4 days. The vegetables will soften further, but the chicken will remain succulent.
Reheating: For best results, reheat in a skillet over medium heat with a splash of water to loosen the glaze. Avoid the microwave if possible to maintain the integrity of the seared chicken texture.
Freezing: You can freeze the cooked chicken and pineapple in the sauce for up to 3 months. However, the bell peppers and onions may lose their structure upon thawing.
Frequently Asked Questions
While you can use breasts, thighs are highly recommended. Thighs stay juicy at high temperatures and have enough fat to achieve those deep, dark char marks described in the recipe.
Yes, for the best visual and flavor results, fresh pineapple is superior. Canned pineapple is often too wet to blister and caramelize effectively at roasting temperatures.
The secret is pre-reducing the sauce with a cornstarch slurry and brown sugar before roasting. This creates a concentrated syrup that clings to the chicken rather than running off.
This specific version is sweet and savory. If you prefer heat, you can add a teaspoon of red pepper flakes or a drizzle of sriracha to the glaze before roasting.
To keep the chicken from drying out, reheat it in a skillet over medium heat with a tablespoon of water. This re-activates the glaze and keeps the chicken succulent.
The Ultimate Sheet Pan Hawaiian Chicken Recipe

Hawaiian Chicken: The Ultimate Sheet Pan Recipe for Sticky Pineapple Glazed Thighs
Ingredients
Equipment
Method
- Combine soy sauce, brown sugar, and pineapple juice in a saucepan. Whisk in cornstarch slurry and simmer until thick and mahogany-colored.
- Toss chicken thighs with oil, salt, and pepper. Roast on the dark metal pan at 425°F (220°C) for 10 minutes until sear marks appear.
- Add pineapple, peppers, and onions to the pan. Coat with 3/4 of the glaze and roast for another 15-20 minutes until pineapple edges are blistered.
- Brush with remaining glaze. Scatter cilantro and toasted sesame seeds over the pan. Serve with steaming jasmine rice.
Notes
If chicken isn't charred enough, broil for 2 minutes at the end of cooking.

Conclusion and Call to Action
This Hawaiian chicken recipe is the perfect blend of forensic visual accuracy and culinary science. It delivers on the promise of sticky, mahogany-glazed perfection that looks just as good as it tastes. Whether you’re cooking for a crowd or just looking to elevate your Tuesday night dinner, this sheet pan wonder is a guaranteed winner.
Did you achieve those perfect char marks? Let us know in the comments below! Don’t forget to follow crispchop on Pinterest for more visually stunning recipe inspiration and share your creations with our community.